Get your paymaster kit right
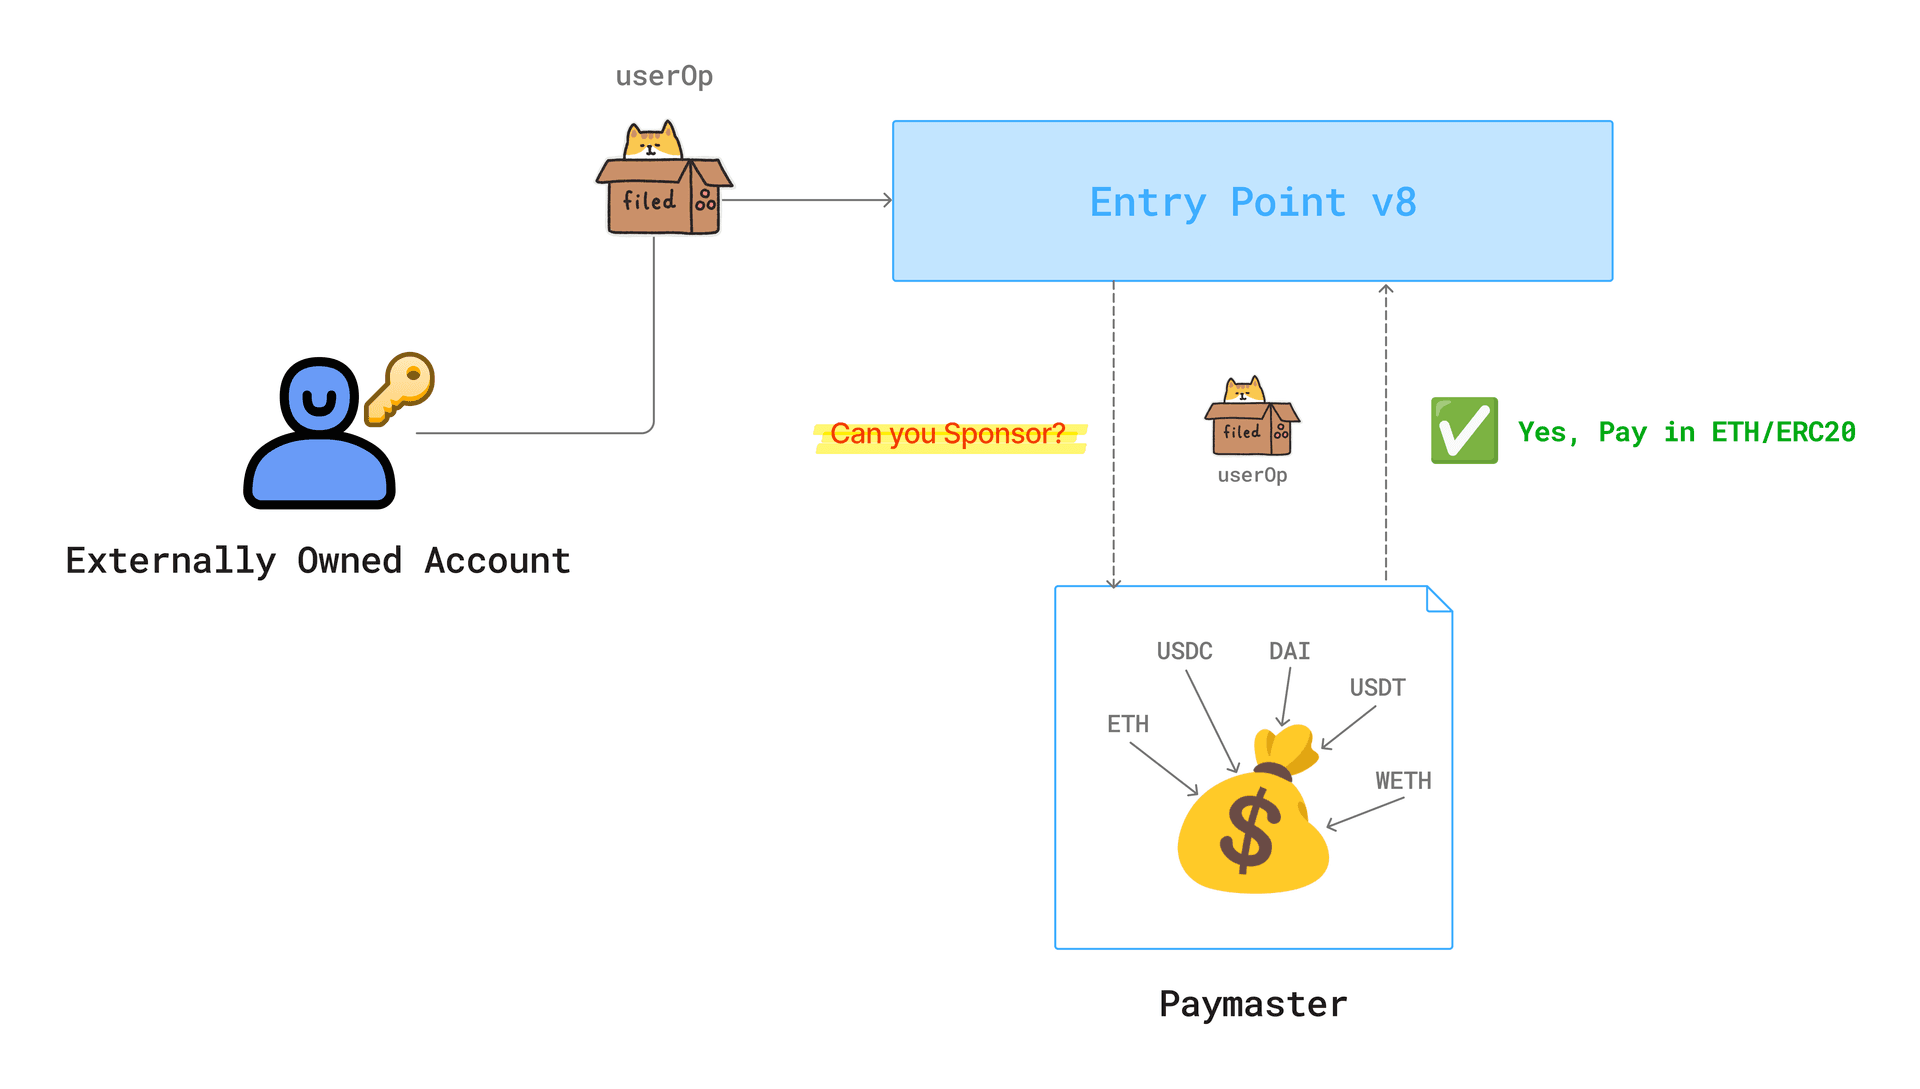
Before you install the paymaster kit, verify that your infrastructure is ready. A paymaster acts as a middleman that pays gas fees on behalf of your users, but it requires specific configuration to function without draining your treasury.
First, ensure you have a funded smart contract wallet on the target chain. You must deploy the paymaster contract and link it to your application’s entry point. If you are using a standard ERC-4337 account abstraction setup, confirm that your bundler and entry point are operational.
Next, define your sponsorship logic. Decide whether you will cover all gas fees or only up to a certain limit. Set up a monitoring system to track your paymaster balance. Running out of funds mid-transaction will cause user sign-ups to fail, so automate top-ups or set clear thresholds.
Finally, test the flow in a sandbox environment. Verify that the paymaster correctly intercepts user operations and pays the miner. Do not skip this step; a misconfigured paymaster can lead to lost funds or broken user experiences.
Set up the paymaster kit
Deploying a paymaster requires precise configuration to ensure funds move securely between parties. This guide walks you through the standard setup process for a physical or digital paymaster kit, focusing on the structural integrity and compliance checks needed for high-stakes transactions. Whether you are managing event payroll, construction site wages, or complex escrow arrangements, the initial setup dictates how smoothly the rest of the process will run.
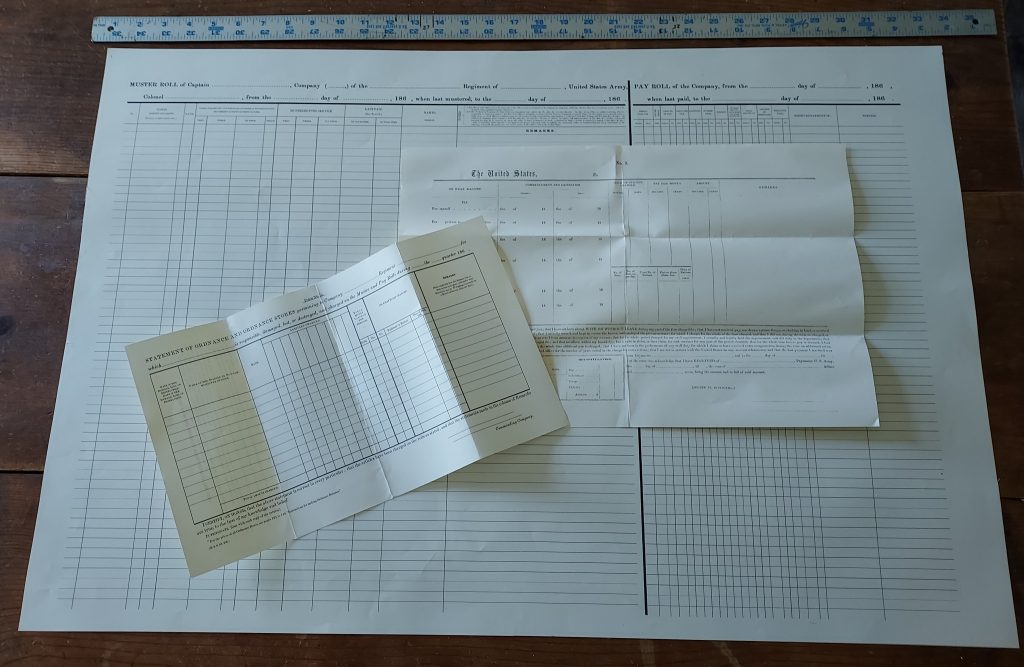
Start by laying out all parts of the kit on a clean, flat surface. For physical kits, this includes the muster board, pay rolls, sealing envelopes, and any tamper-evident seals. For digital implementations, verify you have the API keys, smart contract addresses, and admin wallet credentials. Cross-reference every item against the manufacturer’s inventory list. Missing even a single seal or key can compromise the entire chain of custody, so treat this step as a critical audit rather than a simple unpacking.
Inspect all physical seals for breaks or signs of prior opening. If using a digital kit, run a quick integrity check on your smart contracts or API endpoints to ensure they match the official documentation from the provider. Look for any discrepancies in version numbers or access permissions. This is your first line of defense against fraud; catching a compromised component before funds are introduced prevents costly disputes later.
Define who has permission to view, print, or sign off on payments. In physical kits, this often means assigning specific roles to supervisors and paymasters. In digital setups, set up multi-signature requirements or role-based access controls (RBAC) within your admin dashboard. Restrict admin privileges to only those who absolutely need them. Over-permissioning is a common mistake that leads to unauthorized transactions or accidental data exposure.
Before processing real money, run a test transaction. For physical kits, create a mock pay roll entry and walk through the signing and sealing process. For digital paymasters, execute a small test transfer to a controlled wallet or sandbox environment. Verify that the receipt is generated correctly, the funds are accounted for, and the audit trail is clear. This step confirms that your configuration works as intended without risking actual capital.
Record the serial numbers of physical components or the contract addresses and configuration hashes for digital systems. Store this information in a secure, backed-up location accessible to your compliance team. Clear documentation is essential for audits and helps resolve any future questions about where funds were held or how they were authorized. A well-documented setup is your best proof of due diligence.
Fix common paymaster mistakes
Even with a robust kit, misconfigurations can lead to failed transactions or unexpected costs. These errors usually stem from overlooking gas limits or misunderstanding how the sponsor handles user data. Addressing these pitfalls ensures your app remains reliable and cost-effective.
Underestimating gas requirements
The most frequent error is setting gas limits too low for the paymaster operation. If the gas limit is insufficient, the transaction will fail, and the user may still be charged for the failed attempt depending on your chain configuration. Always test with slightly higher limits than the average estimate to account for network congestion or complex smart contract interactions.
Ignoring signature validation logic
Many developers assume the paymaster kit handles all security checks automatically. This is incorrect. If your custom validation logic is flawed or missing, malicious actors could exploit the system to generate unlimited free transactions. Ensure your signature verification matches the exact format expected by the paymaster contract. A mismatch here renders your security measures useless.
Overlooking user data privacy
Paymasters often process sensitive user data to validate transactions. A common mistake is storing this data without proper encryption or retention policies. This can lead to compliance issues, especially under regulations like GDPR. Review your data handling practices to ensure you are not collecting more information than necessary for the sponsorship logic.
Neglecting fallback mechanisms
Networks are unpredictable. If your paymaster goes offline or encounters an error, users are left stranded. Implement a fallback mechanism that allows transactions to proceed normally if the sponsorship fails, or provides clear error messages to the user. This improves the user experience and prevents frustration during peak usage times.
Paymaster kit: what to check next
Helpful gear
Use these product recommendations as a starting point, then choose the size, material, and price point that fit how you actually use the gear.

As an Amazon Associate, we may earn from qualifying purchases.
No comments yet. Be the first to share your thoughts!